Forums
- Forums
- The Workshop
- Works in Progress
- "Angels' Playmate" P-51
"Angels' Playmate" P-51
Post a reply
- Go to Previous topic
- Go to Next topic
- Go to Welcome
- Go to Introduce Yourself
- Go to General Discussion
- Go to Screenshots, Images and Videos
- Go to Off topic
- Go to Works in Progress
- Go to Skinning Tips / Tutorials
- Go to Skin Requests
- Go to IJAAF Library
- Go to Luftwaffe Library
- Go to RAF Library
- Go to USAAF / USN Library
- Go to Misc Library
- Go to The Ops Room
- Go to Made in Germany
- Go to Campaigns and Missions
- Go to Works in Progress
- Go to Juri's Air-Raid Shelter
- Go to Campaigns and Missions
- Go to Works in Progress
- Go to Skinpacks
- Go to External Projects Discussion
- Go to Books & Resources
-
13 years ago
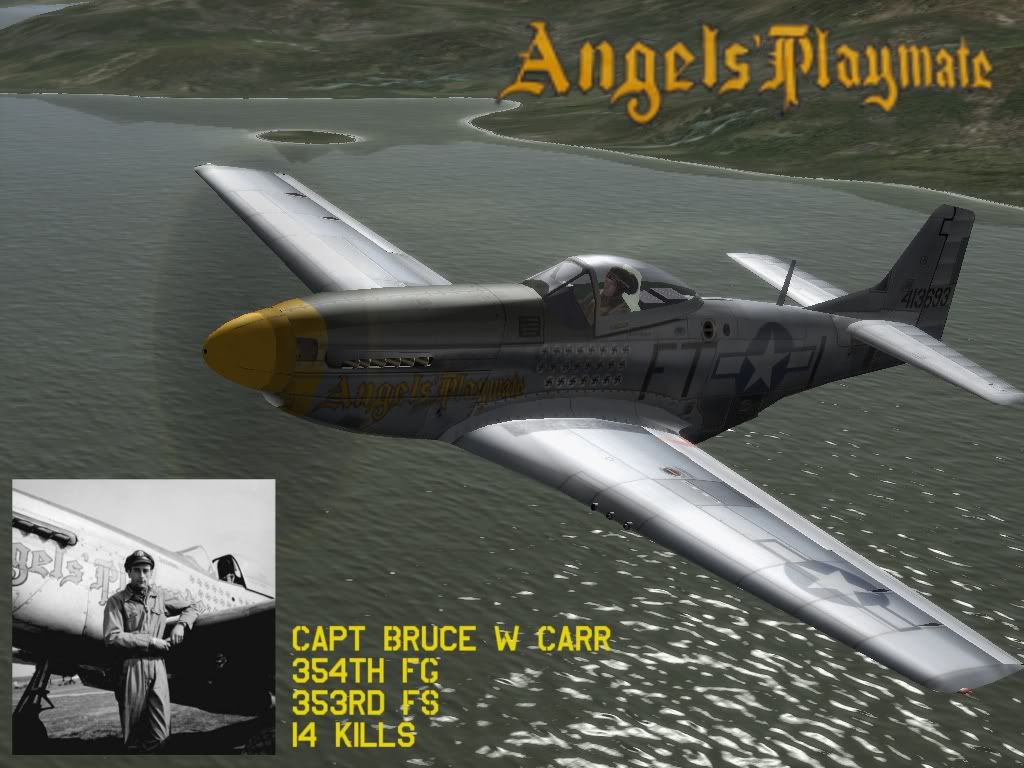
 Level 1I thought this was an interesting historical subject.
This is my first skin in about two years.
I think it is mostly complete.
Started with a great template (Fly-by-Shooter)
Just thought that I would see what you guys think.
Best,
Lefty
-
13 years ago
 Main AdminLooking good.
Here's some colour footage, if you have not already seen it.
http://www.criticalpast.com/video/65675056549_pilots-ready-for-mission_United-States-Army-Air-Force_P-51-planes_insignia-on-plane_World-War-II
Note the stripes on the tail!
Regards Duggy -
13 years ago
 Level 1Thanks, man. This clears up a few subtle details.
 -
 Level 1Very nice! Brilliant work! Wonder what would happen if Angels Playmate & Rosemarie ever met.. One heck of a catfight!
 -
13 years agoMon Jul 30 2012, 03:37am
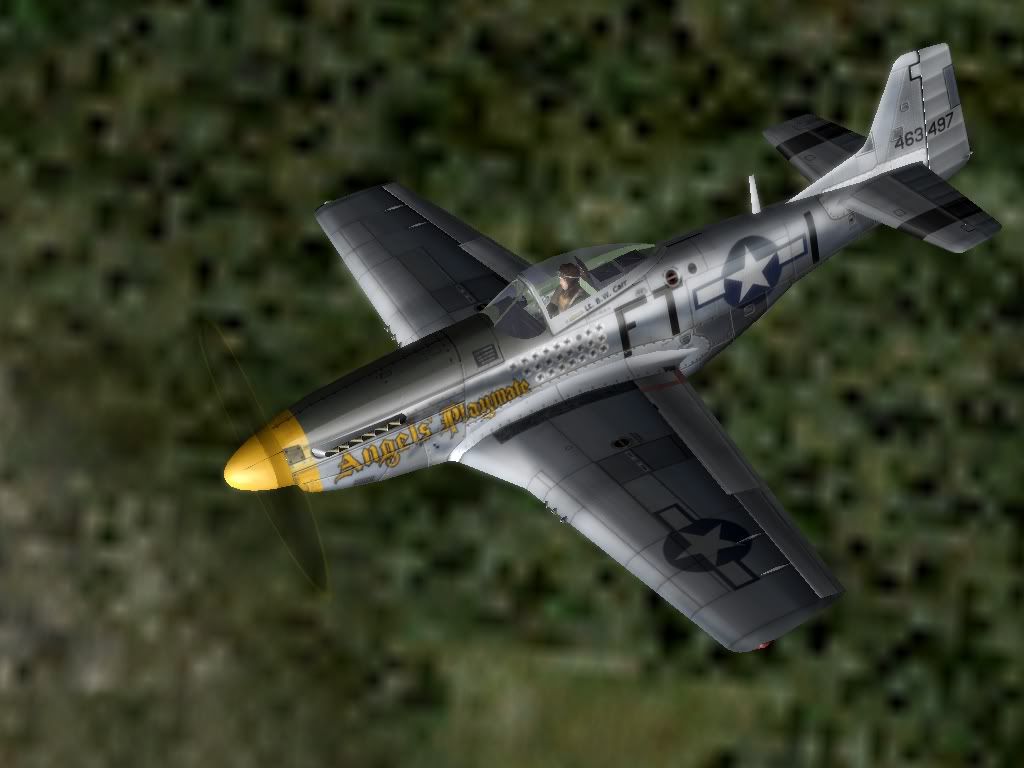
 Level 1Okay, here is the completed bird.
I will probably crawl over this skin for a week searching for wrinkles, but this is 99%.
This is the first skin I have attempted in a couple years and I am pleased.
Thanks to Duggy for a reference source that cleared up a few details.
(And again--I started with a great template by Fly-By-Shooter)
And thanks to all for the welcome here---
Best,
Lefty
-
13 years ago
 AdminHello Lefty, and welcome back
Sounds like you're still looking her over, so I hope I'm not too late to the party.
I made a few observations, although they may already be on your to-do list:
1. Top of cowl: There is a gap between the panel lines at the rear of the hood and near the windscreen. The set near the windscreen might also be out of alignment by a pixel-width or so.
2. Fuselage stencil 'T' appears to spill into the red filler cap.. might be worth checking some photos to see if this was common practice.
3. Tonal variation with the nmf panels is always a nice touch, but I think there is too much contrast in this example (too dark). I'm referring to the leading edge of vertical stabalizer, trim tab, and gun bay access panels.
4. Panel lines appear too dark, but many times, that's just a personal preference; you can never please everyone when it comes to metal. The only places I'd leave them dark, is to simulate the slight gaps around access panels.
5. See that little hole just below the canopy opening in the photo (for rescue/emergency canopy release IIRC)? ..it's missing on the skin ..ooops, no it isn't; it got mixed in with the scoreboard. Try making it darker and highlight only the bottom portion of the opening rim, so it looks more like a hole. There again, if they painted the kill marks to get around the hole, I have a hunch that they may have painted the fuselage stencil to get around the filler cap opening.
6. Shadow beneath the canopy skirt (rear portion) is chopped-off at the seam of the upper fuselage panel.
7. Exhaust stacks need a shadow effect to be consistant with other components with shadows.
8. Spinner color on the template needs to extend a little farther along the edges to get rid of the border showing on the skin's spinner.
9. Orientation of the Hackenkreuz kill-marks does not match those in the photo. Although understandably, this is likely a compromise due to the 1024x1024 resolution of the template (?). At this resolution, if they were rotated to the correct angle, they might appear as undistinguishable black blobs on a white circle. Sometimes we have to make choices, so it's not a show-stopper; I'd rather be able to distinguish the markings as a Hackenkreuz in this case.
10. The inspection plate on the yellow nose, just forward of the exhaust port opening, does not have any paint. Of course this might be intentional to depict later addition of a replacement part.
Hopefully I caught a few things; the more eyes the better. It's always a pain spotting this stuff and fixing it after the skins are released, so I'm glad you posted the WIP pics and allowed us to have a look.
This is certainly a worthwhile aircraft to commemorate. I look forward to seeing your completed project, I think she's going to be a real beauty when you're finished.
All the best! ~ Rudi -
 AdminIf I may be so bold. I noticed that you can see the rivets on the wings. If I am not mistaken, the wings were painted with aluminun paint(?) so the rivets would not be visible. I know in a lot of moder photos, these rivets are visible since many plane owners have not applied that paint, but that was a feature of the acft when first built to give it its speed in addition to the engine, of course. Perhaps toning down the rivets and leaving just a "shadow of where they dimple the skin would be a better effect.
That is just something someone once told me and it worked out very well. -
13 years agoTue Jul 31 2012, 11:55am
 Level 1Hi Lefty,
I don't often critique somebody else's work but as this is a P-51, which is a personal favourite of mine, I will offer what I have noticed. I spent many years getting to know the P-51 template so I know it quite well. For me, getting the IL-2 P-51 model to look good is all about getting the lighting right because, as far as mapping goes, it is one of the best so you really can get the best out of it. Please forgive me if this appears a little full on:- Yellow on the spinner needs extending a little as you can see the mapping seems.
- Lighting of the side and top of the fuselage needs matching. At the minute you can see the seem where the mapping is split. If I were you, I would the lighting on the top of the engine and adjust the side to match as, at the minute, the lighting is kind of washing out the colour of the anti glare panel.
- Shadow under the canopy frame is perhaps a little dark. When the canopy is closed on a Mustang it is a very flush fit, so there should be very little shadow there. (But you are correct to have a little
 )
)
- Panel Lines and Rivets on the wings should be severely reduced. The P-51s wings were covered in a putty, sanded and then painted in silver. This meant that the lines, although visible, were very faint and the rivets were almost invisible. The lines around the gun panels should be a tad stronger with the screws also being clearly visible.
- I also noticed, although it is faint, that you can see the seem of the model just behind the canopy (Above the fuel filler caps).
- Lastly, If it were me, I would adjust the masking layer around the rudder as you can clearly see the black of the mask around the hinge. It's a draw back of Shooter's template.
-
13 years ago
 Main AdminThank God I never took up skinning !!!!!!!!!!!!!!!!
Anyway, I think when finished you will have a fantastic skin.
I hope this is just the beginning.
On another note I remember Rock. Casey and many others when they first got going.
And you are up there!!
So keep going.
Regards Duggy
-
13 years ago
 Level 1Many thanks guys---
I will post screenshots of the improved skin.
I hope you will check back to see the results.
It is already looking much better.
Best,
Lefty
Post a reply
- Go to Previous topic
- Go to Next topic
- Go to Welcome
- Go to Introduce Yourself
- Go to General Discussion
- Go to Screenshots, Images and Videos
- Go to Off topic
- Go to Works in Progress
- Go to Skinning Tips / Tutorials
- Go to Skin Requests
- Go to IJAAF Library
- Go to Luftwaffe Library
- Go to RAF Library
- Go to USAAF / USN Library
- Go to Misc Library
- Go to The Ops Room
- Go to Made in Germany
- Go to Campaigns and Missions
- Go to Works in Progress
- Go to Juri's Air-Raid Shelter
- Go to Campaigns and Missions
- Go to Works in Progress
- Go to Skinpacks
- Go to External Projects Discussion
- Go to Books & Resources
